Recovering photos from corrupted or damaged SD Cards?

SD card is a new ultra-compact, high-capacity, and removable storage medium. It can store your personal photographs, downloaded MP3 files or any other media files. File stored can be easily retrieved from the SD card via a card adapter. It is very convenient to transfer file between a SD card and a computer. SD card's reliability has been greatly increased in the past years, but in the course of normal usage, due to improper use of the SD card (such as a power outage, unexpected disconnection, not properly exiting, etc), it can be damaged. Once this occurs, photos, video, and other files stored in the SD card cannot be accessed. Under normal circumstances, if your SD card suffered no serious physical damage, by using reliable and appropriate photo recovery software, your data can be restored.
How to choose a suitable software to recover photos from a damaged memory card?
If all you want is to recover recently deleted or formatted files from the SD card, there are a lot of options. However, there are only a few software that can recover a damaged or corrupted card.
First, you must select a software which have a SD memory card backup function. This function is specially designed to make a mirror copy of your SD memory card, in order to bypass the bad sectors. Then you can scan and restore the data from the mirrored copy of the file, so you can improve the success rate of recovery, and avoid repeated visits damaged SD card, which many further damage the SD card in question.
Applexsoft Photo Recovery is a reliable software, and it has the above described functions. It allows you to take a bit-by-bit backup of the entire SD card to an image file (which we call a card images), and supports recovering data from an image file.
There are several advantages to work from the image file:
- Hardware security: SD card need only read once.
- Speed: By moving the contents of the card to the hard drive, we do not need to suffer USB 2.x interface speed limits.
- Assurance: Even if something does goes wrong during recovery, such as the re-use of this card, or try to fix it, a backup copy of the original content still exists.
See the following step-by-step guide to recover photos from a damaged SD Cards by using Applexsoft Photo Recovery for Mac :
First, connect your SD card to your computer, we strongly recommend that you use a card reader. (Many recent laptop has a memory card slot.) To make sure that your computer can recognize your SD card.
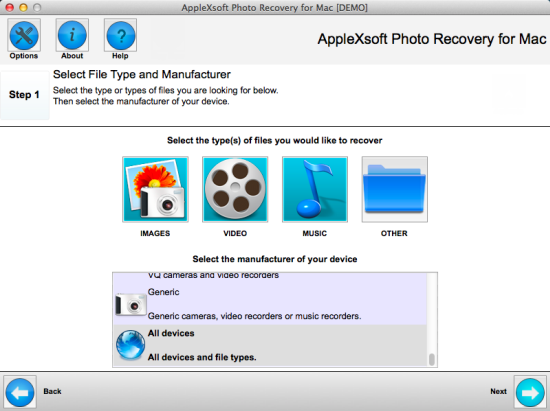
Step 1: Launch the software, the software has an intuitive interface and feature a step-by-step wizard. The first you need to select the type of file you want to restore, there are four options, they are: images, video, music, and other. You can then select your SD card manufacturer. We recommend that you directly select "all devices and file types".
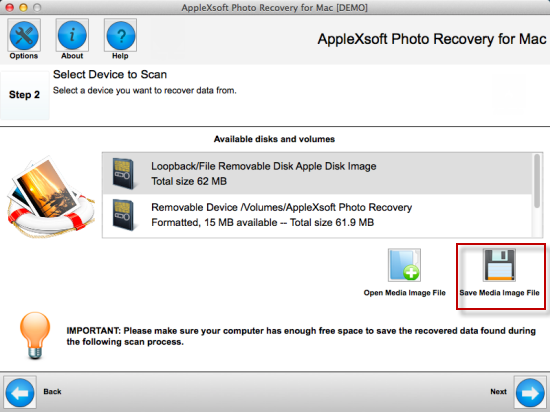
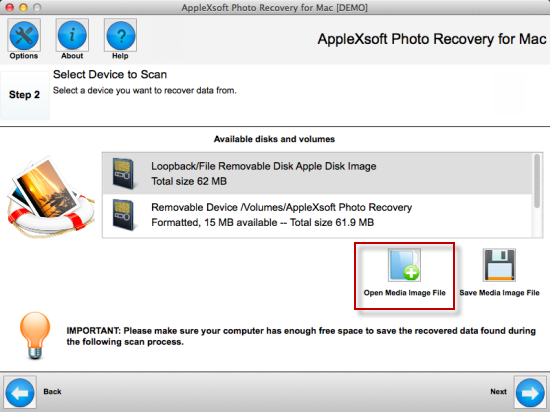
 Step 2
: In this step, the program will display your physical and logical devices connected to your computer. Sometimes, when your card is damaged, it will not display as a logical device, then you will need to select the disk to facilitate recovery.
Also in this step, in the lower right corner there is a "
Save Media Image File" option. Click on this option if you want to create a mirror backup of your SD card, and then select a location that has enough space to save the backup image file.
Once the image is complete. Click on the "Open Media Image File", and select the file you just mirrored. Then go to the next step.
 Step 3
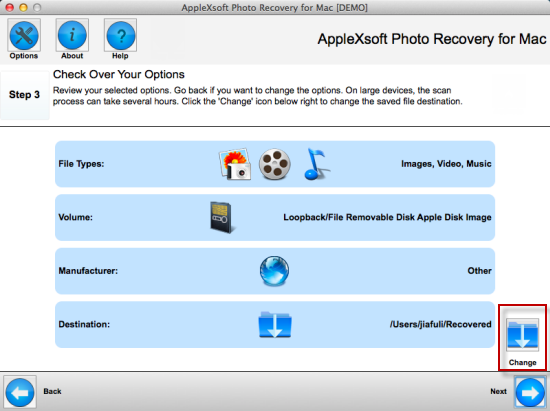
: Before running the scan, check that you have selected the correct options. If it is incorrect, click the Back button to go back and change your choice. Click the "Change" icon at the lower right corner to change a folder to save the recovered data. Click "Next" to start the scan.
 Step 4
: Start to scan your photos and files from the image file; the top of the preview window to will scroll through thumbnails of scanned pictures. You can click on a thumbnail picture to view the properties of the picture. You can also choose to stop or pause scanning. When the scan is complete, click "Next."
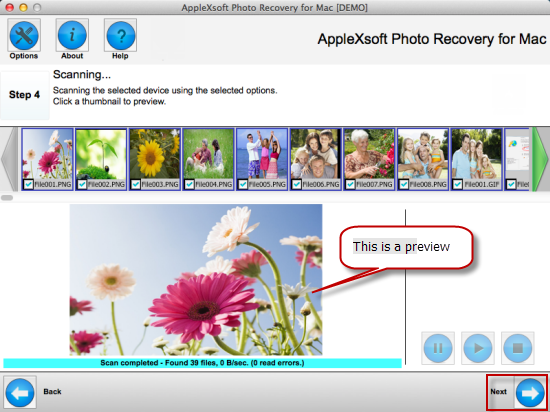

Note: In the process of scan, if you have already found the photos that you need, you can
click 'Stop' button to stop the scanning, and go to the next step.
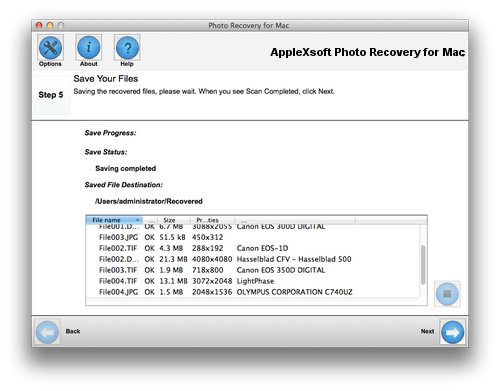
Step 5: Recoverable photos and documents will be automatically saved to the previously selected file folder.
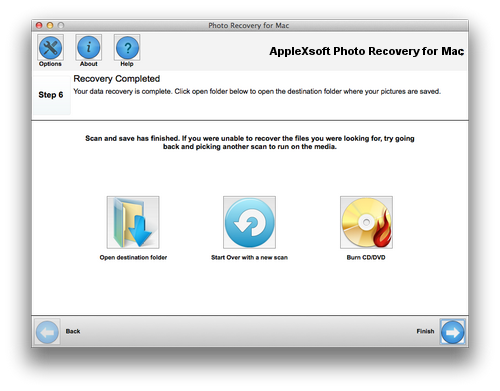
 Step 6
: At this point, your SD card recovery has completed ! Now you can open the target folder to view recovered photos and files. You can also choose to burn the photos/files to a CD / DVD by using the built-in burning software.
If your SD Card is corrupted or damaged, don't worry, download this software immediately.

For Mac OS X 10.6 or Later
If you are using Windows, please download the
AppleXsoft Photo Recovery for Windows.
Note: Not all damaged SD card can successfully recovered. We recommend that you download the trial version
and preview your photos to be sure they actually work.
How to recover data in various cases:

