How to Recover Deleted Photos on Mac ?

People always like taking photos to record what is happening in their lives and to keep them as precious memories. And we usually like to put many photos in one place on computer because it is convenient. But doing this is also easy for us to lose all photos by mistaken deletion, formatting or other reasons. If this happens to you unfortunately and you are a Mac user, please do not worry. The truth of data loss issue is that your lost files have not removed by system immediately. They are just inaccessible on your Mac until new files overwrite the space they occupied. So you still have a chance to get all your photos back as long as you use proper data recovery software. Now I'd like to recommend you our product - AppleXsoft File Recovery for Mac and how to use it to recover deleted photos from Mac hard disk in detailed.
You do really need this product if you have emptied Recycle Bin and the way to restore them from Recycle Bin can not work. AppleXsoft File Recovery for Mac will allow you to recover your lost photos on Mac with several simple steps.
Notice: You can not use AppleXsoft Photo Recovery for Mac to recover photos in your Mac hard disk. Photo Recovery for Mac only can recover photos from digital devices, like memory card, USB flash drive, etc.
Before starting, please stop putting any data into the partition where you just lost photos to avoid overwriting your lost photos.
Now let's use AppleXsoft File Recovery for Mac to recover deleted photos with the following steps:
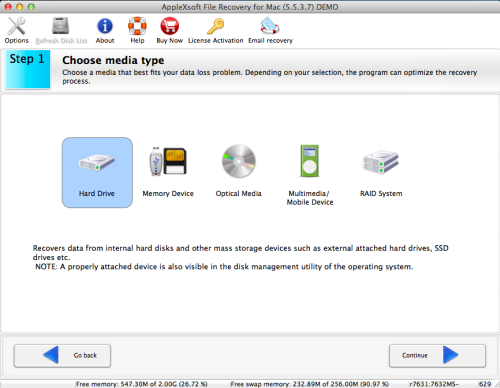
Step 1.Please download and install AppleXsoft File Recovery for Mac, you will see the below screen shot after opening it. The software has wizard style interface and makes it easy to scan and rescue photos from your Mac hard drive.

Step 2. Before recovering your photos, you can set the parameter according to your requirements by clicking "Options" button on the top. Due to we are recovering photos, you can just choose File Types on the left list and only select image files. Or you can just use the system default setting.

Step 3. After setting, please click Continue and choose media type. Here we choose Hard Drive then go to the next step.

Step 4. Select volumes where you deleted photos on the list below then continue.

Step 5. Choose a recovery scenario that best fits your data loss problem. Here we select "Deleted File Recovery" to recover deleted photos. And on the left bottom, you can click the arrow for details and only select HFS+ for Mac. Then continue to enter next step and check your options.

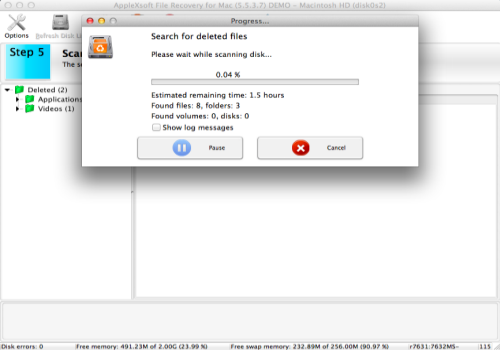
Step 6. Click Continue then the software will scan your Mac hard drive to find deleted photos. This process may spend long time, please be patient and make sure that your laptop is electrified. You can also pause or cancel the process while scanning.

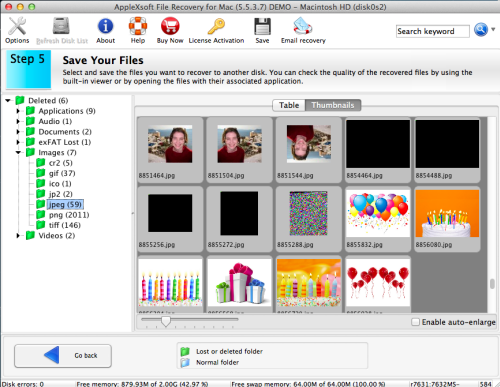
Step 7. When the scan is completed, the deleted photos will shown in the list. You can preview them in thumbnails to see whether they are the photos you deleted or not.

Step 8. Choose photos you want to save, then you can see your precious photos are back. The whole recovery procedure is simple and clear.


Caution: Do not choose the volume where you lost your photos as the destination,
or it will be possible to overwrite the original data of photos you want to recover. You should save
recovering photos to another partition or external device. And you can not save photos if you are
using trial version. You need to purchase full version to save them.
You get back your lost photos!
Peace of mind - Download this software and recover deleted photos on Mac immediately!

Related Questions
 People always like taking photos to record what is happening in their lives and to keep them as precious memories. And we usually like to put many photos in one place on computer because it is convenient. But doing this is also easy for us to lose all photos by mistaken deletion, formatting or other reasons. If this happens to you unfortunately and you are a Mac user, please do not worry. The truth of data loss issue is that your lost files have not removed by system immediately. They are just inaccessible on your Mac until new files overwrite the space they occupied. So you still have a chance to get all your photos back as long as you use proper data recovery software. Now I'd like to recommend you our product - AppleXsoft File Recovery for Mac and how to use it to recover deleted photos from Mac hard disk in detailed.


